What is 8 bit. The concept of bit depth in Photoshop. Bit depth in real life
The bitness of the image is a frequent question. We tell you which option to prefer and why more bits are not alwaysFine.
The standard opinion on this matter is that the more bits, the better. But do we really understand the difference between 8-bit and 16-bit images? Photographer Nathaniel Dodson explains the differences in detail in this 12-minute video:
More bits, Dodson explains, means you have more freedom to work with colors and tones before various artifacts appear in the image, such as banding (“banding”).

If you're shooting in JPEG, you're limiting yourself to a bit depth of 8 bits, which allows you to work with 256 color levels per channel. The RAW format can be 12-bit, 14-bit or 16-bit, with the latter providing 65,536 levels of colors and tones, giving you much more freedom in post-processing. If you count in colors, then you need to multiply the levels of all three channels. 256x256x256 ≈ 16.8 million colors for an 8-bit image and 65 536x65 536x65 536 ≈ 28 billion colors for a 16-bit image.
To visualize the difference between an 8-bit and a 16-bit image, think of the former as a building that is 256 feet tall - that's 78 meters. The height of the second “building” (16-bit photo) will be 19.3 kilometers – these are 24 Burj Khalifa towers stacked one on top of the other.

Note that you can't just open an 8-bit image in Photoshop and "turn" it into 16-bit. By creating a 16-bit file, you give it enough "space" to store 16 bits of information. By converting an 8-bit image to 16-bit, you get 8 bits of unused "space".
 JPEG: no detail, poor color, RAW: not much detail
 But the extra depth means a larger file size - meaning the image will take longer to process and also require more storage space.
Ultimately, it all depends on how much freedom you want to have in post-processing your shots, as well as the capabilities of your computer.
8-bit image, 16-bit image… A scanner with a color depth of 48 bits… Anyone intuitively understands that the greater the color depth, the better something is. But what exactly? And in general - is there any practical use in these figures for a simple car enthusiast?
First, a few basic concepts.
Bit is the smallest piece of information. It may denote
- 0 or 1
black or white
On or Off
Most of today's digital devices work with 8-bit images. It's your inkjet photo printer, and quite possibly even your monitor. That is, almost all the pictures you see are 8-bit.
Small offtopic
If you print a black and white photo on an inkjet machine using only one black cartridge, the quality will be worse than if you print using all the cartridges (four, six or eight - how many do you have there?).
Why is it worse with one black cartridge? Is the image black and white?
Because the printer can reproduce only 256 gradations of brightness - from white to black. For pictures with a large number of halftones and smooth transitions of brightness, this is not enough. The picture looks rough.
If you also use color cartridges, then mixing the three primary colors (magenta, cyan and yellow) can give millions shades of gray (256x256x256). feel the difference
(In fact, everything is somewhat more complicated, but the essence remains - 8 bits is not enough to display even a black and white picture).
How many actually - 8 bits or 24?
Any digital image always consists of 3 primary colors:
- red, green and blue
cyan, magenta and yellow
To store information about each of the 3 colors, 8 bits are used. So to be completely accurate, it would be more correct to call such images not 8-bit, but 24-bit(8x3).
Therefore, an 8-bit image and a 24-bit image are actually synonyms.
8 (24) and 16 (48) bits - two HUGE differences
Instead of just using 8 bit to represent a single color, more advanced devices can sometimes use 12 or even 16 bit.
16 bit image can store 65,536 discrete levels of information for each color, instead of 256 levels to which they are capable 8-bit Images. You can imagine how much more nuance a 16-bit image can convey. If the picture is very complex and delicate, with a large number of halftone transitions, then such a difference can be truly striking.
And just like colored 8-bit 24-bit, as well as colored 16-bit the images are actually 48-bit(16x3), if you remember that they consist of three colors.
Theoretically, a 48-bit image can convey just a crazy amount of color shades. 281474976710656 , to be precise. Not bad…
What are today's microcircuits capable of?
All imaging chips in scanners and digital cameras are capable of generating 24-bit(8x3) images.
Some may generate 36-bit(12x3) photos, and some top models of scanners and cameras can give full 48-bit(16x3) pictures.
Deep color depth has its pros and cons.
How much bullying can a picture withstand?
Often on a monitor, you won't be able to distinguish an 8-bit image from a 16-bit one by eye.
But!
The main moment when the difference between the 8th and 16th bits begins to appear (and strikingly) is during any image editing operation. For example, applying the standby operation Levels or Curves in Photoshop for an 8-bit image can produce much coarser results than for a 16-bit one.
Any image editing operation leads to irreversible loss of information(sometimes barely noticeable, sometimes very noticeable). Sooner or later, this degradation begins to be visible to the eye. A 16-bit image has a much greater "margin of safety" than an 8-bit one.
As big as 65536 is greater than 256.
When the color information of a picture is compressed or stretched when using operations Levels or Curves, the 8-bit file data quickly turns into a sieve, and the histogram into a toothless comb ( as seen in the illustration below). All this leads to posterization. Posterization manifests itself in the form of rough step transitions of color and brightness.

The photo above illustrates this effect well. The range of brightness in this photo is simply huge - from almost scorched, dazzling white clouds to deep shadows on the ground.
In addition, the plot changed every second - the airship either took off or descended, the wind turned it in different directions, people ran, the sun shone in the face, then hid behind the airship. Naturally, it was very difficult to take a perfect picture, and then I had to “finish” it in Photoshop.
Since I was processing a 16-bit image, the final histogram looked more or less satisfactory:

Of course, gaps are visible - information irretrievably lost during processing, but in general everything is alive. And only at the very end, after processing was completed, I converted the image to 8-bit for printing and posting on the Internet.
I tried to do the same operations on the 8-bit version of the image. Compare histograms:

Even if you do not understand what is, it is still clear that there is less information in the "leaky" histogram, and the picture corresponding to it looks worse.
It looks like more than half of the information in an 8-bit image is lost during the editing process. And visually - step transitions appeared in the sky area in the picture - where there should be smooth tonal transitions.

How to get 16 bit image?
16 bit the image from the camera can only be obtained if you shoot in the format RAW.
You pass the RAW file through a special converter program (supplied with the camera, such as DPP or Nikon Capture, or from an independent developer such as Capture One or Raw shooter; By the way, Photoshop can do this too). The converter program converts a RAW file into a 16-bit TIFF file that you can process in Photoshop.
What about those whose camera does not have a shooting mode in RAW?
Converting an 8-bit image to 16-bit mode in Photoshop (Image>Mode>16 Bit/Channel) can help a little. This is the very first thing to do when opening a photo in Photoshop. Of course, such an operation will not make your photo truly 16-bit. But still, the file will become more elastic and resistant to information loss during processing.

What are the disadvantages of a 16-bit image?
First, as already mentioned, You can only get a 16-bit image from a RAW file. (Well, you can still make a 16-bit ersatz in Photoshop, as mentioned above). In any case, this is an additional hemorrhoids. By the way, you most likely cannot view a RAW file with any Windows utility. When storing and sorting photos on a computer, this adds an additional inconvenience.
Secondly, 16-bit files are twice the size than 8-bit ones. This means that they take up more disk space. Well, the RAW file also “weighs” decently, so several times fewer pictures will fit on the memory card in the camera.
Third, some Photoshop features or filters don't work in 16-bit mode(the earlier version of Photoshop, the more features does not work). Therefore, if you have some familiar order of operations when working in Photoshop, you will have to change it. Part of the operations will have to be done in 16-bit mode, and the rest (which is not available in 16-bit mode) - in 8-bit mode.
Fourth, Photoshop can slow down when processing 16-bit files(sometimes - oh-very much to slow down). It's annoying. No less annoying is that in 16-bit mode there is often not enough space on the working disk, where Photoshop keeps its cache. We have to interrupt the work and urgently delete something from this disk so that Photoshop can continue working.
These are not God knows what critical difficulties, but keep them in mind and do not complain that I did not warn you
Practical Conclusions
The highest quality picture can be prepared only from a 16-bit file. This does not mean that any 16-bit file can be turned into a masterpiece. It just means that an 8-bit image will look even worse. Or much worse.
Shoot not just in RAW mode, but in RAW+JPEG mode. Then you will have a JPEG duplicate for each file in the stupid RAW format. It will be much easier for you to navigate through files - view, sort, delete, give. True, for this you will pay extra space on the memory card.
If you are not going to particularly process a series of photos, you can safely use the 8-bit mode (and shoot them not in RAW, but in JPEG).
Apart from this last case, it is always desirable to shoot in RAW mode and process in 16-bit mode.
Digital cameras, or at least professional digital cameras, have had the ability to shoot in RAW format for several years now, allowing you to open images in Photoshop and edit them in 16 bit instead of 8 bit as you normally would with standard JPEG images.
Despite this, many photographers, even professional ones, still take their pictures in JPEG format, even if their camera supports RAW format. And although there are very few weighty arguments when choosing JPEG vs. RAW - high speed shooting and much smaller file sizes are the first thing that comes to mind - many people still shoot in JPEG simply because they don't understand the difference between editing images in 16 bit mode. In this lesson, we will just analyze this difference.
What does the term "8 bits" mean?
You must have heard the terms 8 bits and 16 bits before, but what do they mean? When you take a picture with a digital camera and save it as a JPEG, you are creating a standard 8-bit image. The JPEG format has been around for a long time with the advent of digital photography and even during the development of Photoshop, but lately its shortcomings have become more and more noticeable. One of them is the inability to save a JPEG file in 16-bit format, because it simply does not support it. If it's a JPEG image (with the ".jpeg" extension), it's an 8-bit image. But what does "8 bit" mean anyway?
If you've read our RGB and Color Channels tutorial, you know that every color in a digital image is created from a combination of three primary vibrant colors - red(red), green(green) and blue(blue):
It doesn't matter what color you see on the screen. It was still made from some combination of those three colors. You might be thinking, “That's impossible! My image has millions of colors. How can you create a million flowers from just red(red), green(green) and blue(blue)?
Good question. The answer lies in mixing shades of red, green and blue! There are many shades of each color that you can work with and mix with each other, more than you can imagine. If you had pure red, pure green, and pure blue, then all you can create is seven different colors, including white if you mix all three colors together.

You can also include an eighth color here, black, which you would get if you completely removed the red, green, and blue.
But what if you have, say, 256 shades of red, 256 shades of green, and 256 shades of blue? If you make mathematical calculations, 256x256x256 \u003d 16.8 million. Now you can create 16.8 million flowers! And that, of course, is what you can get from an 8-bit image - 256 shades of red, 256 shades of green, and 256 shades of blue gives you the millions of possible colors you would normally see in a photo:

Where does the number 256 come from? So 1-bit has a value of 2. When you move from 1 bit, you find the value using the expression "2 to the power of (number of subsequent bits)". For example, to find the value of 2 bits, you need to calculate "2 to the power of 2" or "2x2", which equals 4. So 2 bits equals 4.
A 4-bit image would be "2 to the power of 4", or "2x2x2x2", which gives us 16. Therefore, 4 bits equals 16.
We will do the same for an 8 bit image, which will be "2 to the power of 8", or "2x2x2x2x2x2x2x2", which gives us 256. That's where the number 256 comes from.
Don't worry if this seems confusing, incomprehensible, or boring to you. This is just an explanation of how a computer works. Just remember that if you save an image as a JPEG, you are saving it in 8bit mode, which gives you 256 shades of red, green, and blue, 16.8 million possible colors.
So, 16.8 million colors might seem like a lot. But they say that everything is known in comparison, and if you have not compared this with the number of possible colors in a 16-bit image, then you can say that you have not seen anything yet.
As we just figured out, when we save a photo as a JPEG, we get an 8-bit image, which gives us 16.8 million possible colors.
It seems like a lot, and it is, if you think that the human eye can't even see that many colors. We can distinguish only a few million colors, at best, with certain skills, a little more than 10 million, but by no means 16.8 million.
Therefore, even an 8-bit image contains many more colors than we can see. Why then do we need more colors? Why is 8 bits not enough? So, we'll come back to this a little later, but first, let's look at the difference between 8-bit and 16-bit images.
Previously, we figured out that an 8-bit image gives us 256 shades of red, green, and blue, and we got this number using the expression "2 to the power of 8" or "2x2x2x2x2x2x2x2", which equals 256. We will do the same calculations for to find out how many colors we can get in a 16 bit image. All we need to do is find the value of the expression "2 to the power of 16" or "2x2x2x2x2x2x2x2x2x2x2x2x2x2x2x2", which, if you calculate on a calculator, is 65,536. This means that when we work with a 16-bit image, we have 65,536 shades of red , 65,536 shades of green and 65,536 shades of blue. Forget about 16.8 million! 65536 x 65536 x 65536 gives us 281 trillion possible colors!
Now you might be thinking, “Wow, that’s great, but you just said that we can’t even see the 16.8 million colors that an 8-bit image gives us, are these 16-bit images that give us so important? trillions of colors we can't see?"
When it comes time to edit our images in Photoshop, this is really important. Let's see why.
Editing in mode (mode) 16 bits.
If you have two identical photos, open them in Photoshop, the difference should be that one image should be in 16-bit mode with its trillions of possible colors, and the other in 8-bit mode with its 16.8 possible colors. You must have thought that the 16 bit version of the image should look better than the 8 bit version because it has more colors. But the obvious fact is that many photographs simply do not contain 16.8 million colors, let alone trillions of colors to accurately reproduce the content of the image.
They usually contain a few hundred thousand colors at best, although some can reach several million depending on their content (and also depending on the size of the photo, since you need millions of pixels to see a million colors). Plus, as you already know, the human eye can't see at least 16.8 million colors. This means that if you place two 8-bit and 16-bit images side by side, they will look the same to us.
So why is it better to work with 16-bit images? One word - flexibility. When you edit an image in Photoshop, sooner or later if you keep editing it you will run into problems. The most common problem is known as aliasing, where you lose so much detail in an image that Photoshop can't render smooth transitions from one color to another. Instead, you get a terrible staggered effect between colors and their tonal values.
Let me show you what I mean. Here are two simple black and white gradients I created in Photoshop. Both gradients are the same. The first one was created as an 8 bit image. You see the number 8 circled in red at the top of the document window, which indicates that the document is open in 8-bit mode:

And here is the exact same gradient created as a 16-bit image. There are no differences other than the fact that the document title says 16-bit mode, both gradients look the same:

See what happens when I edit them. I'm going to apply the same changes to both gradients. First, I'll press Ctrl+L (Win) / Command+L (Mac) to invoke Photoshop's adjustment. Levels(Levels), and without getting into the details of how levels work, I just move the bottom black and white sliders output values(Output) towards the center. Again, I'll do this with both gradients:

Moving the lower black and white sliders of the Output Values (Output) towards the center in the Levels dialog box ( Levels ).
Essentially, I've taken the full range of gradients from pure black on the left to pure white on the right, and squashed them into a very small segment in the center that ends up being mid-tones of gray. I didn't actually change the gradient. I just concentrated his tonal range in a very small space.
Click OK to exit the dialog box Levels(Levels) and now let's look at the gradients again. Here is an 8 bit gradient:

And here is a 16 bit gradient:

Both gradients after correction with Levels(Levels) now look like solid gray, but they still look the same even though the top gradient is in 8-bit mode and the bottom one is 16-bit. See what happens when I apply again Levels(Levels) to stretch the tonal range of the gradient back to pure black on the left and pure white on the right. I will move the black and white sliders Input values(Input) dialog box Levels(Levels) towards the center, this time to distribute the dark parts of the gradient back to pure black on the left and the light parts back to pure white on the right.

Moving Input Values ( Input ) black and white sliders towards the center to distribute the dark parts of the gradient back to pure black on the left and the light parts back to pure white on the right.
Let's look at our two gradients again. The first is an 8 bit gradient:

Ouch! Our anti-aliased black and white gradient no longer looks like it! Instead, it has the "stepped" effect that I was talking about, where you can easily see how the grayscales change one after another, and this is because we lost a huge part of the image details after making those adjustments that we did with levels(Levels). So the 8-bit image didn't do the job very well. Let's see what happened to the 16 bit image:

Look at him! Even after the big adjustments I made with Levels(Levels), 16-bit gradient did the job without a single blot! Why is that? Why did an 8 bit gradient lose so much detail, but a 16 bit one didn't? The answer lies in what we have talked about up to this point. An 8-bit image can only contain a maximum of 256 shades of gray, while a 16-bit image can contain up to 65,536 shades of gray. Even though both gradients looked the same at the beginning, the 16k extra grays give us more flexibility during editing and the likelihood of any problems later on. Of course, even 16 bit images eventually get to a point where they start to lose a lot of detail and you will see problems after a lot of image editing, but in 8 bit images this point comes faster, and with 16 bit we can deal with much longer. .
Let's try this time to consider the same things using an ordinary photo as an example.
Editing a photo in (mode) 16 bit
Let's try the same editing experiment on a full color photo. I took the beach ball photo we saw on the first page. Here is the image in standard 8 bit mode. Again we see the number 8 at the top of the document window:

And here is the same photo, but in 16-bit mode:

Both images look the same at the moment, as do those two gradients.
The only difference between the two is that the top image is 8 bit and the bottom image is 16 bit. Let's try to make the same adjustments using Levels(Levels). I am currently editing the image. extreme method, this is certainly not something you would normally do with your images. But this way will give you a clear idea of how much we can damage an image if it is in 8-bit mode compared to the slight damage that occurs when editing a 16-bit version of an image.
I press Ctrl+L (Win) / Command+L (Mac) again to bring up the dialog Levels(Levels), and move the sliders output values(Output) at the bottom towards the center, at the same point as in the case of gradients. I do the same again with both images: 8 bit and 16 bit versions of the images:

Moving the white and black sliders of the Output Values ( Output ) toward the center in the Levels dialog box.
Here's what an 8-bit image looks like after concentrating the tonal range into the small space where you would normally find midtone information:

And here is what a 16-bit image looks like:

Again, both versions are identical. There are no visible differences between the 16 bit and 8 bit versions.
Now let's call Levels(Levels) and set the tone values back so that the dark areas become pure black and the light areas become pure white:

Moving the black and white slider of the Input Values ( Input ) toward the center in the Levels dialog box to center the dark areas of the image in black and the light areas in white.
Now let's see if there is any difference between the 16 bit version and the 8 bit version. For starters, 8 bits:

Oh no! As with the gradient, the 8-bit image suffered some pretty decent damage through editing. There is a very noticeable shift in color, especially on the water, which looks like some kind of painting effect rather than a full color photo. You can also see the damage on the beach ball as well as the sand at the bottom of the photo. So far, the 8-bit image has been of little use.
Let's see what happened to the 16-bit image:

Again, just like with the gradient, the 16-bit version was left untouched! Every bit remained the same as before editing, while the 8 bit image lost a lot of detail. And this is all because the 16 bit version has such a huge number of possible colors at its disposal. Even after the hard impact I did, I couldn't do any visible damage to the image thanks to the 16-bit mode.
So how can you take advantage of a 16 bit image? Just. Always take pictures in RAW format instead of JPEG (of course, if your camera supports raw), then open and edit it in Photoshop as a 16-bit image. Keep in mind that when you're working with a 16-bit image, it's larger than an 8-bit image, and if you have an older computer, it can take a while to process your photo in Photoshop. Also, despite the fact that new versions of Photoshop are getting better and better every time in this regard, not every filter is available for image correction in 16-bit mode, but most of the main ones work. If you want to work in 8 bit mode, go to the menu Image(Image) at the top of the screen and select Mode(Mode), and then select 8 bits. Try to work in 16-bit mode for as long as possible before switching to 8-bit mode. Also make sure you switch to 8bit mode before printing the image, or even save your 16bit version of the image as a Photoshop .PSD file and then save a separate 8bit version for printing.
© 2014 site
Bit depth or color depth A digital image is the number of binary digits (bits) used to encode the color of a single pixel.
The terms should be distinguished bits per channel(bpc - bits per channel) and bits per pixel(bpp - bits per pixel). The bit depth for each of the individual color channels is measured in bits per channel, the sum of the bits all channels is expressed in bits per pixel. For example, an image in the Truecolor palette has a bit depth of 8 bits per channel, which is equivalent to 24 bits per pixel. the color of each pixel is described by three color channels: red, green and blue (RGB model).
For an image encoded in a RAW file, the number of bits per channel is the same as the number of bits per pixel, because before interpolation, each pixel obtained using a Bayer color filter array contains information about only one of the three primary colors.
In digital photography, it is customary to describe bit depth primarily in terms of bits per channel, and therefore, when talking about bit depth, I will only mean bits per channel, unless otherwise expressly stated.
Bit depth determines the maximum number of shades that can be present in the color palette of a given image. For example, an 8-bit black and white image can contain up to 2 8 =256 shades of gray. A color 8-bit image can contain 256 gradations for each of the three channels (RGB), i.e. total 2 8x3 =16777216 unique combinations or color shades.
High bit depth is especially important for the correct display of smooth tonal or color transitions. Any gradient in a digital image is not a continuous change in tone, but a stepped sequence of discrete color values. A large number of gradations creates the illusion of a smooth transition. If there are too few halftones, the aliasing is visible to the naked eye and the image loses its realism. The effect of visually distinguishable color jumps in areas of the image that initially contain smooth gradients is called posterization(from the English poster - a poster), because a photograph in which halftones are missing becomes like a poster printed using a limited number of colors.
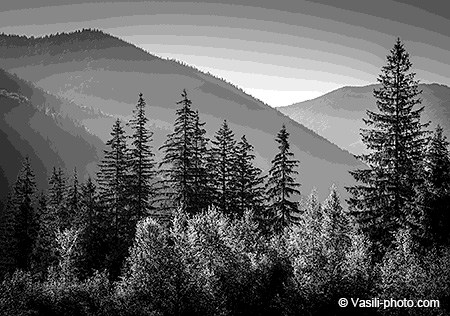
Bit depth in real life
To clearly illustrate the above material, I will take one of my Carpathian landscapes and show you how it would look with different bit depths. Remember that increasing the bit depth by 1 bit means doubling the number of shades in the image's palette.

1 bit - 2 shades.
1 bit allows you to encode only two colors. In our case, it is black and white.

2 bits - 4 shades.
With the advent of halftones, the image ceases to be just a set of silhouettes, but still looks quite abstract.

3 bits - 8 shades.
Foreground details are already visible. The striped sky is a good example of posterization.
4 bits - 16 shades.
Details begin to appear on the slopes of the mountains. In the foreground, the posterization is almost invisible, but the sky remains striped.

5 bits - 32 shades.
Clearly, areas of low contrast, which require a lot of close midtones to display, suffer the most from posterization.

6 bits - 64 shades.
The mountains are almost in order, but the sky still looks like steps, especially closer to the corners of the frame.

7 bits - 128 shades.
I have nothing to complain about - all the gradients look smooth.

8 bits - 256 shades.
And here is the original 8-bit photo. 8 bits is enough for realistic transmission of any tonal transitions. On most monitors, you won't notice the difference between 7 and 8 bits, so even 8 bits may seem like overkill. But still, the standard for high-quality digital images is precisely 8 bits per channel, in order to block the ability to human eye distinguish between color gradations.
But if 8 bits is enough for realistic color reproduction, then why would you need more than 8 bits? And why all this noise about the need to save photos with a bit depth of 16 bits? The matter is that 8 bits are enough for storage and display of a photo, but not for its processing.
When editing a digital image, tonal ranges can either shrink or stretch, causing some values to be constantly discarded or rounded off, and eventually the number of halftones may fall below the level required to reproduce smooth tonal transitions. Visually, this is manifested in the appearance of the same posterization and other eye-catching artifacts. For example, lightening shadows by two stops stretches the brightness range by four times, which means that the edited areas of an 8-bit photo will look as if they were taken from a 6-bit image, where the aliasing is very noticeable. Now imagine that we are working with a 16-bit image. 16 bits per channel means 2 16 = 65535 color gradations. Those. we can freely discard most of the midtones and still get tonal transitions theoretically smoother than in the original 8-bit image. The information contained in 16 bits is redundant, but it is this redundancy that allows the most daring manipulations with a photograph without visible consequences for image quality.
12 or 14? 8 or 16?
Typically, a photographer is faced with the need to decide on the bit depth of a photo in three cases: when selecting the bit depth of the RAW file in the camera settings (12 or 14 bit); when converting a RAW file to TIFF or PSD for further processing (8 or 16 bits) and when saving a finished photo for archive (8 or 16 bits).
Shooting in RAW
If your camera allows you to choose the bit depth of the RAW file, then I definitely recommend that you prefer the maximum value. Usually you have to choose between 12 and 14 bits. The extra two bits will only slightly increase the size of your files, but you will get more freedom when editing them. 12 bits make it possible to encode 4096 brightness levels, while 14 bits encode 16384 levels, i.e. four times more. In view of the fact that I carry out the most important and intensive image transformations precisely at the stage of processing in the RAW converter, I would not want to sacrifice a single bit of information at this stage, which is critical for future photography.
Convert to TIFF
The most controversial stage is the moment of converting the edited RAW file to 8- or 16-bit TIFF for further processing in Photoshop. Quite a lot of photographers will advise you to convert exclusively to 16-bit TIFF, and they will be right, but only on the condition that you are going to do deep and comprehensive processing in Photoshop. How often do you do this? Personally, I don't. I do all the fundamental transformations in the RAW converter with a 14-bit non-interpolated file, and use Photoshop only for polishing the details. For small things like spot retouching, selective lightening and darkening, resizing and sharpening, 8 bits is usually enough. If I see that the photo needs to be processed aggressively (we are not talking about collages and HDR), this will mean that I made a serious mistake at the stage of editing the RAW file, and the most reasonable solution would be to go back and fix it, instead of rape an innocent TIFF. If the photo contains some delicate gradient that I still want to correct in Photoshop, then I can easily switch to 16-bit mode, perform all the necessary manipulations there, and then return to 8 bits. The image quality will not be affected.
Storage
To store already processed photos, I prefer to use either 8-bit TIFF or JPEG saved at maximum quality. I am driven by the desire to save disk space. 8-bit TIFF takes up half the space than 16-bit, and JPEG, which in principle can only be 8-bit, is about half the size of 8-bit TIFF even at maximum quality. The difference is that JPEG compresses the image with lossy data, while TIFF supports lossless compression using the LZW algorithm. I don't need 16 bits in the final image because I'm not going to edit it anymore, otherwise it simply wouldn't be final. Some little thing can be easily corrected in an 8-bit file (even if it's a JPEG), but if I feel like doing a global color correction or changing the contrast, then I'd rather turn to the original RAW file than torment the already converted photo, which even in the 16-bit version, it does not contain all the information necessary for such transformations.
Practice

This photo was taken in a larch grove near my house and converted with Adobe Camera Raw. With the RAW file open in ACR, I'll apply an exposure compensation of -4 EV, simulating 4 stops of underexposure. Of course, no one in their right mind makes these mistakes when editing RAW files, but we need to achieve a perfectly mediocre conversion using a single variable, which we will then try to fix in Photoshop. I save a rather darkened image in TIFF format twice: one file with a bit depth of 16 bits per channel, the other - 8.
At this stage, both images look equally black and indistinguishable from each other, and therefore I show only one of them.
The difference between 8 and 16 bits will become noticeable only after we try to brighten the photos, while stretching the range of brightness. To do this, I will use the levels (Ctrl / Cmd + L).

The histogram shows that all the tones in the image are concentrated in a narrow peak pressed against the left edge of the window. To brighten the image, it is necessary to cut off the empty right side of the histogram, i.e. change the value of the white point. Grabbing the right input level slider (white point), I pull it close to the right edge of the flattened histogram, thereby giving the command to distribute all the gradations of brightness between the untouched black point and the newly designated (15 instead of 255) white point. Having done this operation on both files, we compare the results.


Even at this scale, an 8-bit photo looks more grainy. Let's increase it to 100%.


16 bit after clarification

8 bits after clarification
The 16-bit image is indistinguishable from the original, while the 8-bit one is heavily degraded. If we were dealing with real underexposure, the situation would be even worse.
Obviously, such intensive transformations as lightening a photo by 4 steps are really better to carry out on a 16-bit file. The practical significance of this thesis depends on how often you have to correct such a marriage? If often, then you are probably doing something wrong.
Now let's say that I saved the photo as an 8-bit TIFF as usual, but then suddenly decided to make some drastic changes to it, and all the backup copies of my RAW files were stolen by aliens.
To simulate destructive but potentially reversible editing, let's go back to levels.

In the cells of the output levels (Output Levels) I enter 120 and 135. Now, instead of the available 256 gradations of brightness (from 0 to 255), useful information will occupy only 16 gradations (from 120 to 135).

The photograph is predictably gray. The image is in place, just the contrast has decreased by 16 times. Let's try to fix what we have done, for which we will again apply the levels to the long-suffering photo, but with new parameters.

Now I have changed the Input Levels to 120 and 135, i.e. moved the black and white points to the edges of the histogram to stretch it over the entire range of brightness.

The contrast is reanimated, but the posterization is noticeable even at a small scale. Let's increase it to 100%.

The photo is hopelessly damaged. The 16 halftones remaining after the insane editing are clearly not enough for any realistic scene. Doesn't this mean that 8 bits is really useless? Do not rush to make hasty conclusions - the decisive experiment is yet to come.
Let's go back to the untouched 8-bit file and switch it to 16-bit mode (Image>Mode>16 Bits/Channel), after which we repeat the entire procedure of outrage against the photo, according to the protocol described above. After the contrast has been barbarously destroyed and then restored again, we will transfer the image back to 8-bit mode.

Is everything all right? What if you increase it?

Impeccable. No posterization. All operations with levels took place in 16-bit mode, which means that even after reducing the brightness range by 16 times, we still have 4096 gradations of brightness, which was more than enough to restore the photo.
In other words, if you have to edit an 8-bit photo in a responsible way, turn it into a 16-bit one and work as if nothing had happened. If even such absurd manipulations can be carried out with the image without fear for the consequences for its quality, then even more so it will easily survive the expedient processing that you can really subject it to.
Thank you for your attention!
Vasily A.
post scriptum
If the article turned out to be useful and informative for you, you can kindly support the project by contributing to its development. If you did not like the article, but you have thoughts on how to make it better, your criticism will be accepted with no less gratitude.
Do not forget that this article is subject to copyright. Reprinting and quoting are permissible provided there is a valid link to the original source, and the text used must not be distorted or modified in any way.
- (eng. The Beat Generation, sometimes translated as "The Broken Generation") is the name of a group of American authors who worked on prose and poetry. The beat generation influenced the cultural consciousness of its contemporaries from the middle ... Wikipedia
BIT- "Wireless information technologies" LLC Moscow, organization, tech. Source: http://www.vedomosti.ru/newspaper/article.shtml?2004/10/29/82849 BIT secure information technology Department of St. Petersburg State Institute of International Relations, education and science, St. Petersburg, techn… Dictionary of abbreviations and abbreviations
A; pl. genus. bit and ov; m. [from English. abbreviations BInary digiT binary sign] The minimum unit for measuring the amount of information and the amount of computer memory (equal to one cell or one binary sign of the yes no type). * * * bit (English bit, from ... ... encyclopedic Dictionary
Bits per second, bps (bits per second, bps) is the basic unit of information transfer rate used at the physical layer of the OSI or TCP/IP network model. For more high levels network models are usually used more ... ... Wikipedia
Bits per second, bps (bits per second, bps) is the basic unit of information transfer rate used at the physical layer of the OSI or TCP/IP network model. At higher levels of network models, as a rule, ... ... Wikipedia
- (Spanish). The same as real, a coin worth 16 1/2 kopecks. Dictionary of foreign words included in the Russian language. Chudinov A.N., 1910. BIT 1 [Eng. beat beat] muses. dance and light music sustained at a uniform tempo in 4/4 time with ... ... Dictionary of foreign words of the Russian language
parity bit- parity bit check bit A check bit added to the data to check its validity in such a way that the sum of the binary ones that make up the data, including the one of the check bit, is always even (or always odd). [Domarev… … Technical Translator's Handbook
Beat (eng. beat beat) English translation of the meaning of the word share (musical). For many users of musical computer programs, this word is found in the designation of the BPM playback speed (English beat per minute, bpm beats per minute), ... ... Wikipedia
- (eng. bit from binary binary and digit sign), a binary unit, in information theory a unit of the amount of information. A bit in computing is a binary digit, a binary digit. the number of bits of computer memory determines the maximum number of binary digits ... Big Encyclopedic Dictionary
- (German: Leipziger Beatdemo) took place on October 31, 1965 in the center of Leipzig. The demonstration was directed against the government's ban on the music of the Beat and numerous musical groups. The demonstration was caused by the ten released ... ... Wikipedia
- (big beat) (English beat blow), a term referring to early British rock (the first half of the 1960s). It spread in the countries of Eastern Europe and the USSR in the 1960s and early 70s to define youth song and dance music close to … encyclopedic Dictionary
Books
- Bit Hotel. Ginsberg, Burroughs and Corso in Paris 1957-1963 by Barry Miles. Quote "The so-called beat generation was represented by a group of people of different nationalities who came to the conclusion that modern society sucks" Amiri Barak What is the book about This is a story ...


